Joined: Thu Mar 17, 2011 8:34 am Posts: 5323 Location: Tasmania
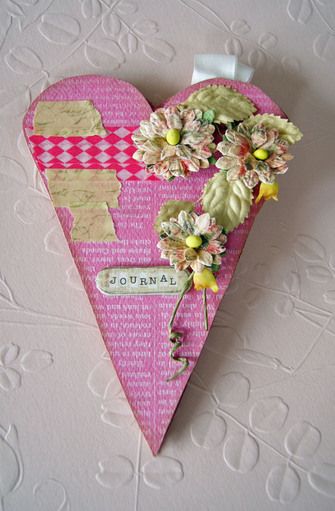
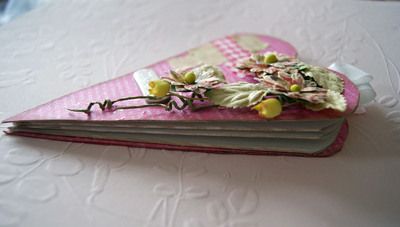
This little mini-album takes a little bit of effort.. but is really worth it. I enjoyed putting this together using the pink Authentique Lively 'Spirited' Paper as the covers and heart inserts and 12x12 Vanilla Cardstock for the inside.
STEP ONE First of all, you need this.. and this is where the effort is. For the template below to make this to the size I made approx 6x4inches... you need a 12x12 printer... or take it to Xerox like I did Copy and paste the template to word doc (as much as I've tried to keep that template copied to here 'square' - its a little 'out' so when you copy it to your word doc.. adjust the size so that it measures the same across as down) and print it out. Then I jumped in my car and asked for 3 copies... one about 30cmsx30cms, another no more than 29 x29cms, and the last no more than 28x28cms (whatever the size, make sure there is about a centimetre difference between each one) You'll find the covers need to be the biggest size, the middle size is the inside of the mini, and the smallest size will be the heart inserts with the tags on them (It will all make sense as we go through the instructions.
STEP TWO I used a little tiny bit of double sided tape to stick the MIDDLE-SIZED template to hold in place on my cardstock (remember this will need pulling back off - so use 'just' enough) and cut both the template and cardstock out together with your craftknife. The dotted lines are where we are going to fold in in the next step, but that straight line from the edge into the middle - needs cutting too.
STEP THREE the template needs folding like a concertina fan - do this together still with your template attached to your cardstock so you know where to fold. Once you have done this, carefully remove your template - and hopefully the side that you had the sticky on will be the side we dont see.
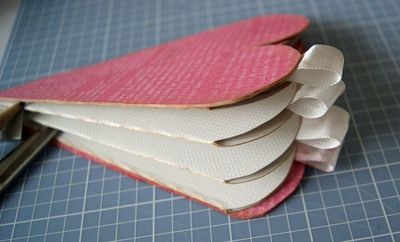
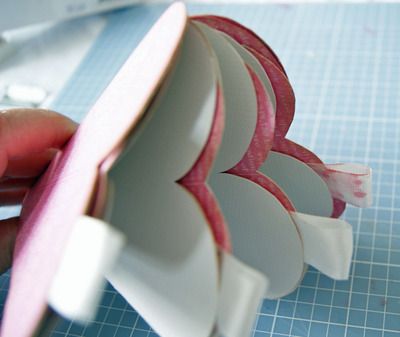
STEP FOUR Now fold your concertina cardstock heart up... you can see if you hold onto one side of the heart it will make a booklet with pockets - you will need to glue each of those straight edges together.
So it should then be able to fall open like this See the little pockets
STEP FIVE Time to cut one heart out of your biggest template... this is for the covers.
and.... Trace around it with pencil onto your patterned paper you will need to do this twice
You will need two of these - one for the front cover and one for the back cover
Or if you are like me and dont like the pattern on the other side and know the edges will be seen when opening the booklet.... cut out four and stick two sides together Dont forget to ink the edges if you'd like. I inked mine with Ranger Pumice Stone
STEP SIX Stick the covers to the back and front of the folded booklet.
It should look like this when its flat.
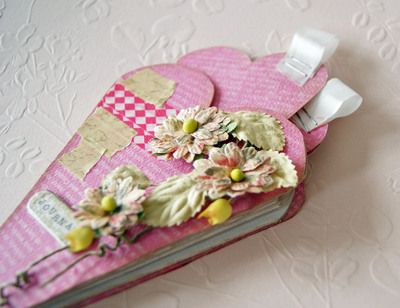
STEP SEVEN Cut one little heart from the SMALLEST template, trace and cut out four out of the same paper as the covers and these will be the heart inserts (with little ribbon tags on them) And of course if you dont like the back of the paper - then cut eight and stick together.
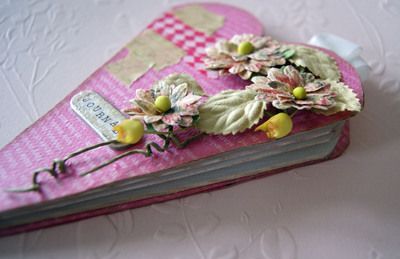
STEP EIGHT Ink the edges and then staple your ribbon tags to the top side of the heart - I used the seam binding from Tim Holtz Trimmings
Users browsing this forum: No registered users and 1 guest
You cannot post new topics in this forum You cannot reply to topics in this forum You cannot edit your posts in this forum You cannot delete your posts in this forum You cannot post attachments in this forum